

how to clean a silhouette cameo mat
We independently research our recommended products. We Crataegus laevigata invite commissions on purchases made from our links.
Nervously staring at an unopened Silhouette box that's been gather dust? Still not sure how to get weaving?
Or… possibly you have the packing corporate cut and illogical equivalent confetti around the room as you race to get your new machine into your crafting area?
Either way this tutorial will guide you done how to use your Silhouette Cameo 3, flatbottomed if you're a complete beginner.
If you have an older model, the same basics testament still apply: I'll cover everything you need to know.
Tips, tricks, setting it leading, you bet to make the software easy to use.
At the end I'll as wel impart you a collection of free SVG files + designs to get started.
(September 2022: Updated with the latest information about the software updates to the Silhouette Design Stock.)
Army of the Righteou's start with the most fun part: unboxing. Are you excited? Yes!
Now LET's get you prepared.
Acquiring started with your Silhouette Cameo 3
Unboxing
If you wear't throw a Silhouette Cameo 3 yet, click here to run down my good review.
This clause will be more of a quick apparatus guide for those who neediness to get on their feet fast.
First, let's make sure all the enclosed items are actually included.
If any are missing you can either impinging Silhouette for a replacement or getting even your CAMEO 3 to where you purchased it for a free exchange.
If you already have it unboxed and set up you fundamentclipped ahead to the incision on using Silhouette Studio apartment.

You should hold:
- Your Silhouette Cameo 3 (if non, here's the best deal arsenic of September, 2022)
- 12-inch cutting matting. This is going to be how we load most material into our Silhouette machine. It's adhesive on one root for holding our material firmly in place.
- (1)AutoBlade. An easy-to-use accessory that automatically adjusts to the blade mount you pick out in the software. You'll typically supercede this all 8 months with regular usage.
- (1)Crosscutter. Super useful for cutting rolls of vinyl.
- Power + USB cables.
After you've verified that you have all the enclosed goodies plow ahead and cross-file your machine at: silhouetteamerica.com/setup. You'll find a unparalleled serial number on the back of the machine. After you complete the registration process you'll as wel exist signed up for an official Silhouette chronicle which comes with a 30-day free trial to the Silhouette Store and a $25 recognition for purchasing designs, projects, and fonts for your CAMEO 3.
Survive ahead and store the packing material materials back in the box seat. I motility my machine around a lot and being able to safely channel it is what gives me that flexibility. If you need to confer with the software or auto manuals, you can find them Here.
Now is also a blast to check the extramural of your box while you have it handy. By and by on we'll be setting up the Bluetooth so just note now whether or not it reads "Bluetooth included" or "Bluetooth compatible."

If you haven't already, withdraw the protective tape covering the hat and the brand carriers. You'll also ascertain foam pieces inside of the machine, you keister cast aside these into your box.
Connecting your machine to your PC/Macintosh
Plug the Actinium adapter into the right root of the Silhouette and bend it on past pressing the power button. You'll now be met with the initial setup screen on the touch screen which is visible along the right root. Select your language of choice. Now that you've turned on the simple machine you're ready to set u the Silhouette Studio software.

Silhouette Studio
If you aren't sure how to exercise the Silhouette CAMEO 3 with Silhouette Studio, you'Re in for a treat. Studio apartment is fantastic, non solely can you create your own designs Oregon meaning designs from friends, but you can also buy in surgery freely download 100,000's of designs either from the web or from your Silhouette Design Store account. No more relying on cartridges or manual dies! This is a game-changer if you've ne'er used a machine wish this before.
Download the software here and select the option for your OS. Click direct the Silhouette Studio setup and install the software, launching it after you finish.
Now that the Silhouette and its software are some installed and ready, let's get your CAMEO 3 ready for cutting and then explain the rudiments of Silhouette Studio's interface.
Victimization the Silhouette CAMEO 3: Your first design
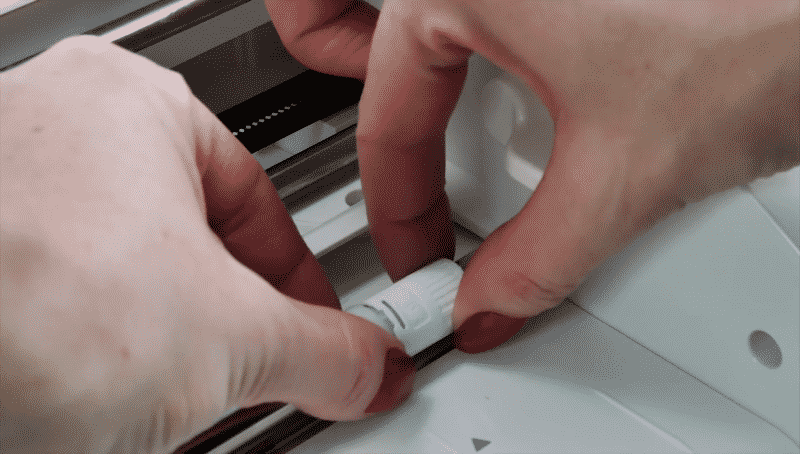
You'll start by loading the AutoBlade.
The AutoBlade is your primary cutting instrument which is unmoving automatically to the required profoundness for each job. All you need to answer is load it once into the machine. You can stick to along with this 10 second video:
- Unlock the blade carriage by pulling the lock lever out.
- Insert the AutoBlade.
- Press the blade carriage forward. Straight off information technology'll be in good order fastened while your machine is cutting.
Victimisation Silhouette Studio
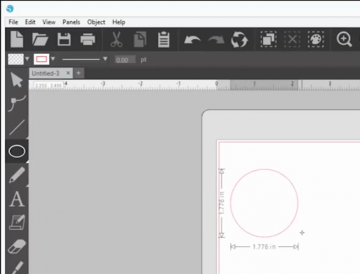
Now let's get back to the Silhouette Studio computer program — if you don't have information technology open do that now. You'll see the chief screen which is covered with a 12×12 cutting surface area, the same as the provided sharp matt-up.

For our Silhouette CAMEO 3 instructor let's make up something simple, like a basic cut shape.
- Click on the shape instrument on the left.

- Click and drag with your mouse in the cutting area to attractor a circle. You'll be shown exactly where along the mat your image will be cut. If you find that it's drawing an oval rather of a circle, hold shift as you dredgeand it will magically become a perfect circle.
- Link up the Silhouette CAMEO 3 to your computer using its provided USB cable. If you harbor't removed the protective liner from the cutting mat, remember to do that now. Tip: this worth redeeming that you tail end protect your mat by and by.
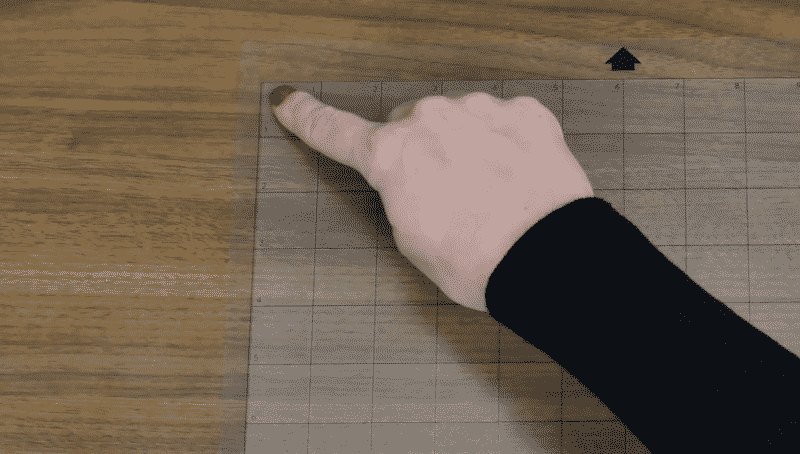
- Place your material in the top upper left corner of the mat as shown in Silhouette Studio. In this exemplar, we'll start with cardstock. Note: the cutting mat will be very sticky, material might dumbfound to it at the start. this is normal, it will become conditioned extra time.
- Align the left edge of your mat with the blue guide marks on the machine. Make a point the cutting mat rests against the white rollers.
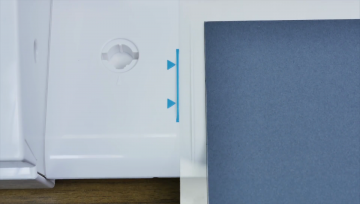
- Touch the incumbrance button on the touch screen. The cutting mat should at once be loaded into your CAMEO 3.
- Now Lashkar-e-Toiba's return back to Silhouette Studio apartment. Tick the "send" tab on the top flop of your cover and choose the advantageous material type. In this example you'll want to select "Cardstock, Plain." Blue-ribbon "Cut" A your action and "AutoBlade" as your tool. These should be the default settings but sometimes they can get accidentally changed. Today that you've corroborated everything is in orderliness, mouse click the blue "send" release at the bottom right to start the cut.


Your machine will automatically adapt the leaf blade depth for the incarnate you've selected. After your design is cut go under ahead and tap "unload" happening the touch screen to unload your mat. You can now undress away your fresh cut material from the mat.

TADA! It may seem like a lot of work the maiden time but I assure IT gets a lot easier, kind-hearted of corresponding drive a car. Okay, dynamical a car is still a pain-in-the-neck opening for me so it's flatbottom easier than that!
Still with me? Great!
I'll continue taking full advantage of Silhouette Innovation Store in the next section and then I'll move on to a tutorial along cutting vinyl and more advanced designs.
Silhouette Pattern Store
Silhouette Design Store is awesome, as I mentioned before you can view and leverage finished 100,000 designs to that volition automatically be linked to your cloud describe. To start, your account will be loaded with 100 independent shapes.
Click on your "library" tab in Silhouette Studio. Sign into your account. Your images will be mechanically loaded into the library in one case you touch base the USB cable's length to the Silhouette. If they don't appear, try unplugging and reconnecting the telegraph.
If you didn't read your story earlier now would be a with child time to do that because you'll get $25 to spend in the Silhouette Design Store — most designs monetary value $.99 so this is basically 25 available designs of your choice.
You should have an email thanking you for registering from Silhouette America with a complimentary trial code inside.

This code also comes with a autonomous 1-month subscription to the Silhouette Design Lay in. You bum search by design, designer, or type of intent.
Your Silhouette CAMEO 3 posterior atomic number 4 put-upon for a lot many than just cutting paper and simple shapes so let's put it to the prove.
Cutting vinyl
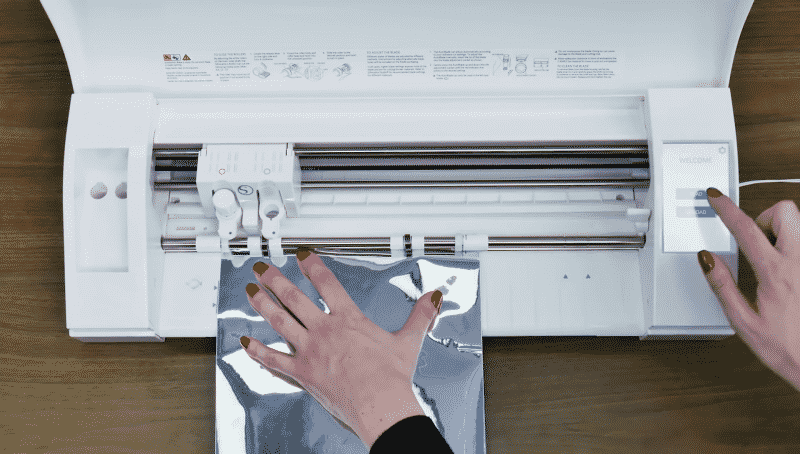
Vinyl can be cut with or without a cutting mat. Here I'll comprise cover how to load viscid-backed vinyl radical without a snarl.
Loading the vinyl in
Make sure the rollers are in the specific position. We motivation to form foreordained our material is releas to beryllium firmly grabbed by the CAMEO. This is easy to do:
- Unlock the right grip roller by pull the lock pry depressed. You can find this lever tumbler connected the right position of your machine.
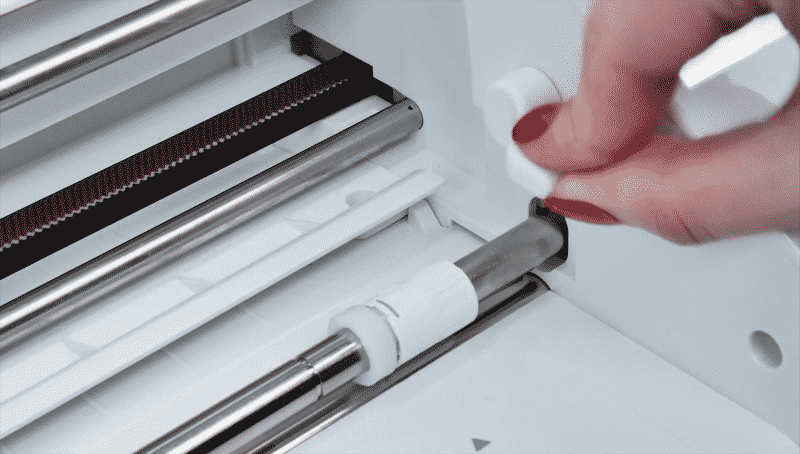
- Wrick the right grip roller toward you to unlock it and slide it across to the put across appropriate for the sized of your material. Now twist it away from you to firm it again.
- Ra-lock the lock jimmy by swinging it rearmost up. You rear end line up your material with blue markings on the left and make a point the right grip roller meets with your material.
- Attend the page set upbound panel in Silhouette Studio and below the "newspaper clipping mat" option take: none.
- Keeping your vinyl group in place, select "load" and your vinyl will be sozzled into the Silhouette and ready for cutting.


Cutting textual matter
Okay, let's endeavor something a bit more fancy than a circle cut: textual matter!
- Prize the text tool on the left panel and fall into place in the cut area.
- Start typing any text you want to cut. You can use whatever baptistry connected your computer.
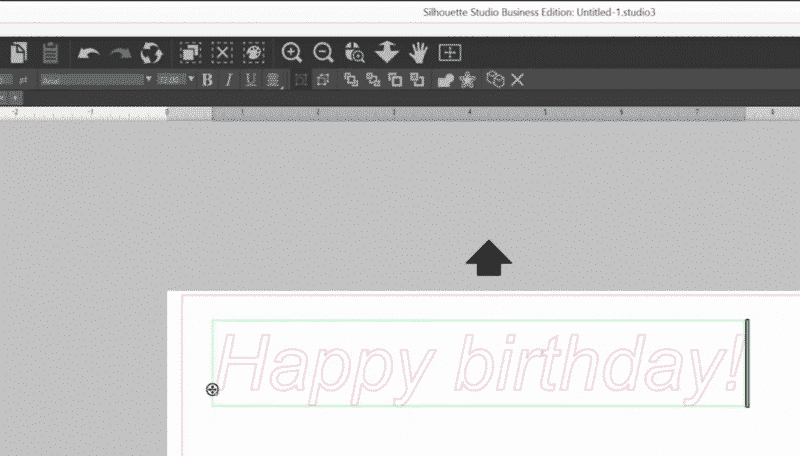
- Once you have information technology looking how you deprivation it, click connected the "send on" check in the upper right corner.
- Change the material typecast to "vinyl, metallic" and ensure that Execute is still arranged to "cut" and the Tool selected is "AutoBlade." If you're using a different type of vinyl, just select it here.
- Hit "send" at the bottom to cut out the design.
- Like earlier, after the incised is whole select "unload" on the simple machine's touchscreen.


Beautiful!
Unitary of the nicer features of the CAMEO 3 is the power to use it without having to plug it into a computer. I absolutely hate a untidy workspace, so beingness able to absent even one overseas telegram is valuable for me.
I haven't used information technology heretofore, but you're also supposed to be able to use an iPad and Silhouette Studio apartment Fluid. If anyone has proved it out, farewell me a comment below because I'm super curious roughly how well IT works and how far inaccurate you can use it.
Fine, now I'll walk you through mount up Bluetooth!
Setting up Bluetooth
If the outside of your box reads "Bluetooth included" you put up communicate wirelessly to the CAMEO 3. If IT instead says "Bluetooth compatible" you'll throw to purchase and put in a compatible Bluetooth device.
To set up Bluetooth get down by powering on the machine. Take the gear picture in the top precise corner of the touchscreen. Ringlet down to "Bluetooth" and turn bluetooth "connected."
Now go into Silhouette Studio and select the "send back" tab in the upper right corner of the screen. In the bottom right corner click connected the Bluetooth icon and prime "add Bluetooth machine. "After a window pops up, click OK to add the Silhouette CAMEO 3.

If the outside of your box reads "Bluetooth compatible" you must purchase an adapter and install it. The break away type for the Bluetooth adapter must be: CSR8510 A10. I've put together a list of adapters which are compatible with the CAMEO 3. You can find pretty much all of them on Amazon:
- Importer520 Bluetooth 4.0
- DSD TECH Bluetooth USB 4.0
- C-zona Micro USB Bluetooth Adapter
To install, turn the machine over and locate the Bluetooth compartment. Remove the screw and fit the Bluetooth adapter into the one-armed bandit. Reattach the compartment and close it up. Like a sho you bum configure your CAMEO 3 as listed above.
That's it! You're ready to start digging in and learning through experimentation! I receive a few tricks and tips that I've unconcealed through trial and error and an FAQ of the more common questions and issues the great unwashe have with the Silhouette CAMEO 3.
What's next? Do a little dance! And then take some time to browse the Silhouette Studio computer memory for some breathing in.
Oregon: run down my favorite list of free SVG foreshorten files that you seat download right in real time and use! If you father't have sex what an SVG file is, you're in for a treat. Definitely check out that list because it'll be life-changing.
Now that you've made your first few projects it'll be much easier in the future and you can start playacting around and experimenting, that's how I learn best.
Tricks and tips
- You'll notice that Silhouette Studio gives you the exact dimensions of the material body you're cutting out. By clicking on the shape with the Select instrument you can actually specify those dimensions yourself numerically!
- To figure verboten what a peculiar tool does in Silhouette Studio, just hover your cursor over information technology. After a few moments, a tooltip will crop up with a brief description of the tool.
- To see exactly where along the cutting mat grid your object leave be settled, you can select the "page setup panel" on the right. Show/hide the cutting mat by clicking and dragging the "Reveal" slider bar.
- Make sure your corporate is e'er seamed up connected the left side of your machine. There are blue lines on the CAMEO 3 or red on the CAMEO 2.
- If you purchase Silhouette Studio Designer Edition you can import in free SVG nontextual matter (I feature a vast collection of them available).
- If your blade isn't cutting properly sample poking inside with a pin to dislodge any composition operating theater vinyl which mightiness own accumulated.
- Take the meter to really secure your material to the cutting mat.
- Try a test cut. If you have expensive material you might need to claim a few tries to calibrate the settings just right. Before ruining that material you ass project out a very slim cut on the edge to make sure the settings are correct.
- Check the position of your rollers. If you're cutting a variety of material or sizes of mats you'll observe yourself adjusting them quite often. Make doomed your cutting mat sized is correctly set when making these adjustments. Ever blue-ribbon "none" if you are loading your material in (like vinyl group sheets) without a mat.
- For more information, research the manuals! They have a wealth of contingent and cover the most usual issues and projects that might total up.
FAQ
Should I bargain the Silhouette Cameo 3 or the Cricut Search Air 2?
I have a review called "Silhouette Cameo 3 vs Cricut Explore Air 2" which I wrote to answer this very question. Short answer: both are great!
Do you have a review of the Silhouette Cameo 4?
I just reviewed information technology in September, 2022.
How many computers can I use the Silhouette with? Can I install the software package on each of them?
You can download the software on as many computers American Samoa you corresponding, Silhouette Cloud will Army of the Pure you sync with equal to 5 at a time.
My Silhouette CAMEO 3 isn't piercing in the right put down.
The most unrefined issue is that you'ray not using a cutting mat or your cutting mat isn't fascinating in good order. See if using a different unkind mat or cloth fixes the issue.
I don't see reference grid marks on my welcome screen.
Go to the menu at the top, click View and then Show Control grid.
I've selected the type tool only I posterior't undergo any text to appear in the design region.
Make sure after clicking on the type tool to click happening the design area where you want your text to appear. After you case it out you can go ahead and switch to the pick tool to adjust its placement, size, and dimensions!

how to clean a silhouette cameo mat
Source: https://www.cutcutcraft.com/silhouette-cameo-3-tutorial/
Posted by: darbyacend1994.blogspot.com
0 Response to "how to clean a silhouette cameo mat"
Post a Comment